Category Archives: House

Driveway wall repair and painting

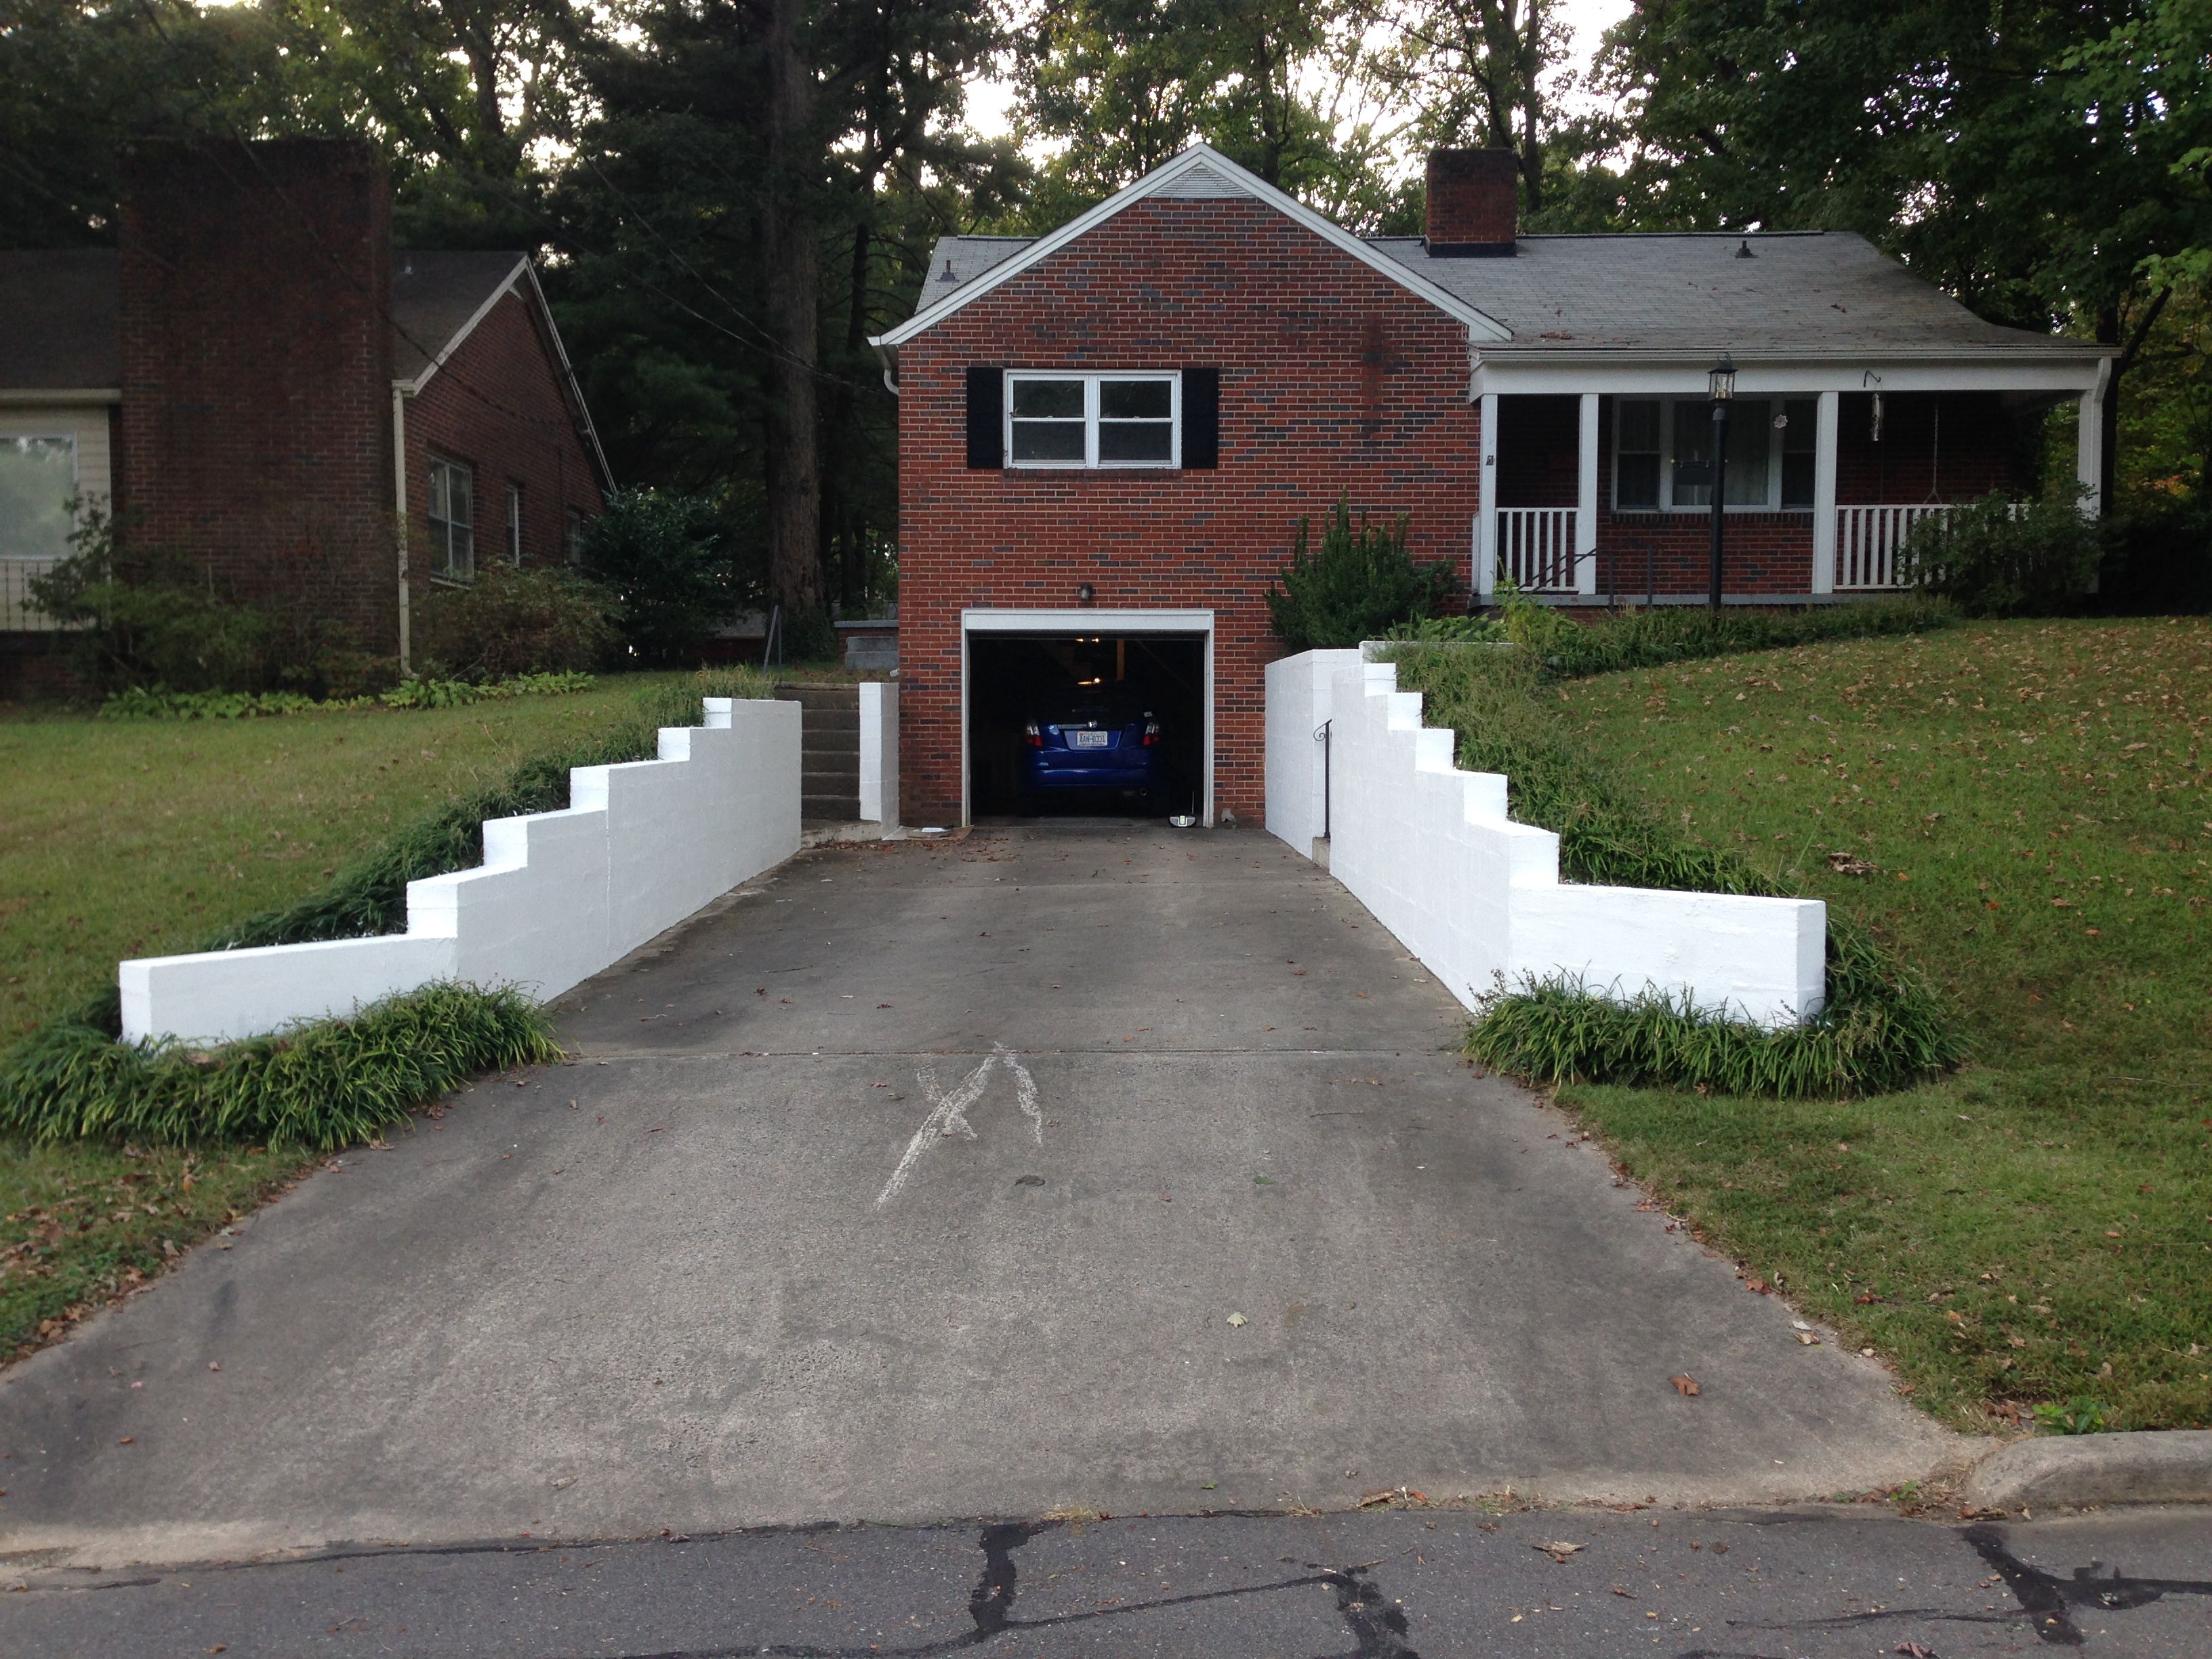
I haven’t done a ton to the house this summer, hence the massive lack of updates. But there is one major project that I just finished. My driveway wall has been looking a bit worse for wear – cracks, water/mud stains, a few loose blocks, and lots of chipping and peeling paint. So this summer, I finally tackled it , with lots of parental assistance. First I rented a pressure washer to clean the whole thing thoroughly. It took a couple hours to wash the entire wall, but it was incredibly satisfying to see it get clean. We also took the pressure washer over to my parents’ house and washed their brick pathway, which went from a blackish greenish shade to actually brick-colored. It was highly impressive.

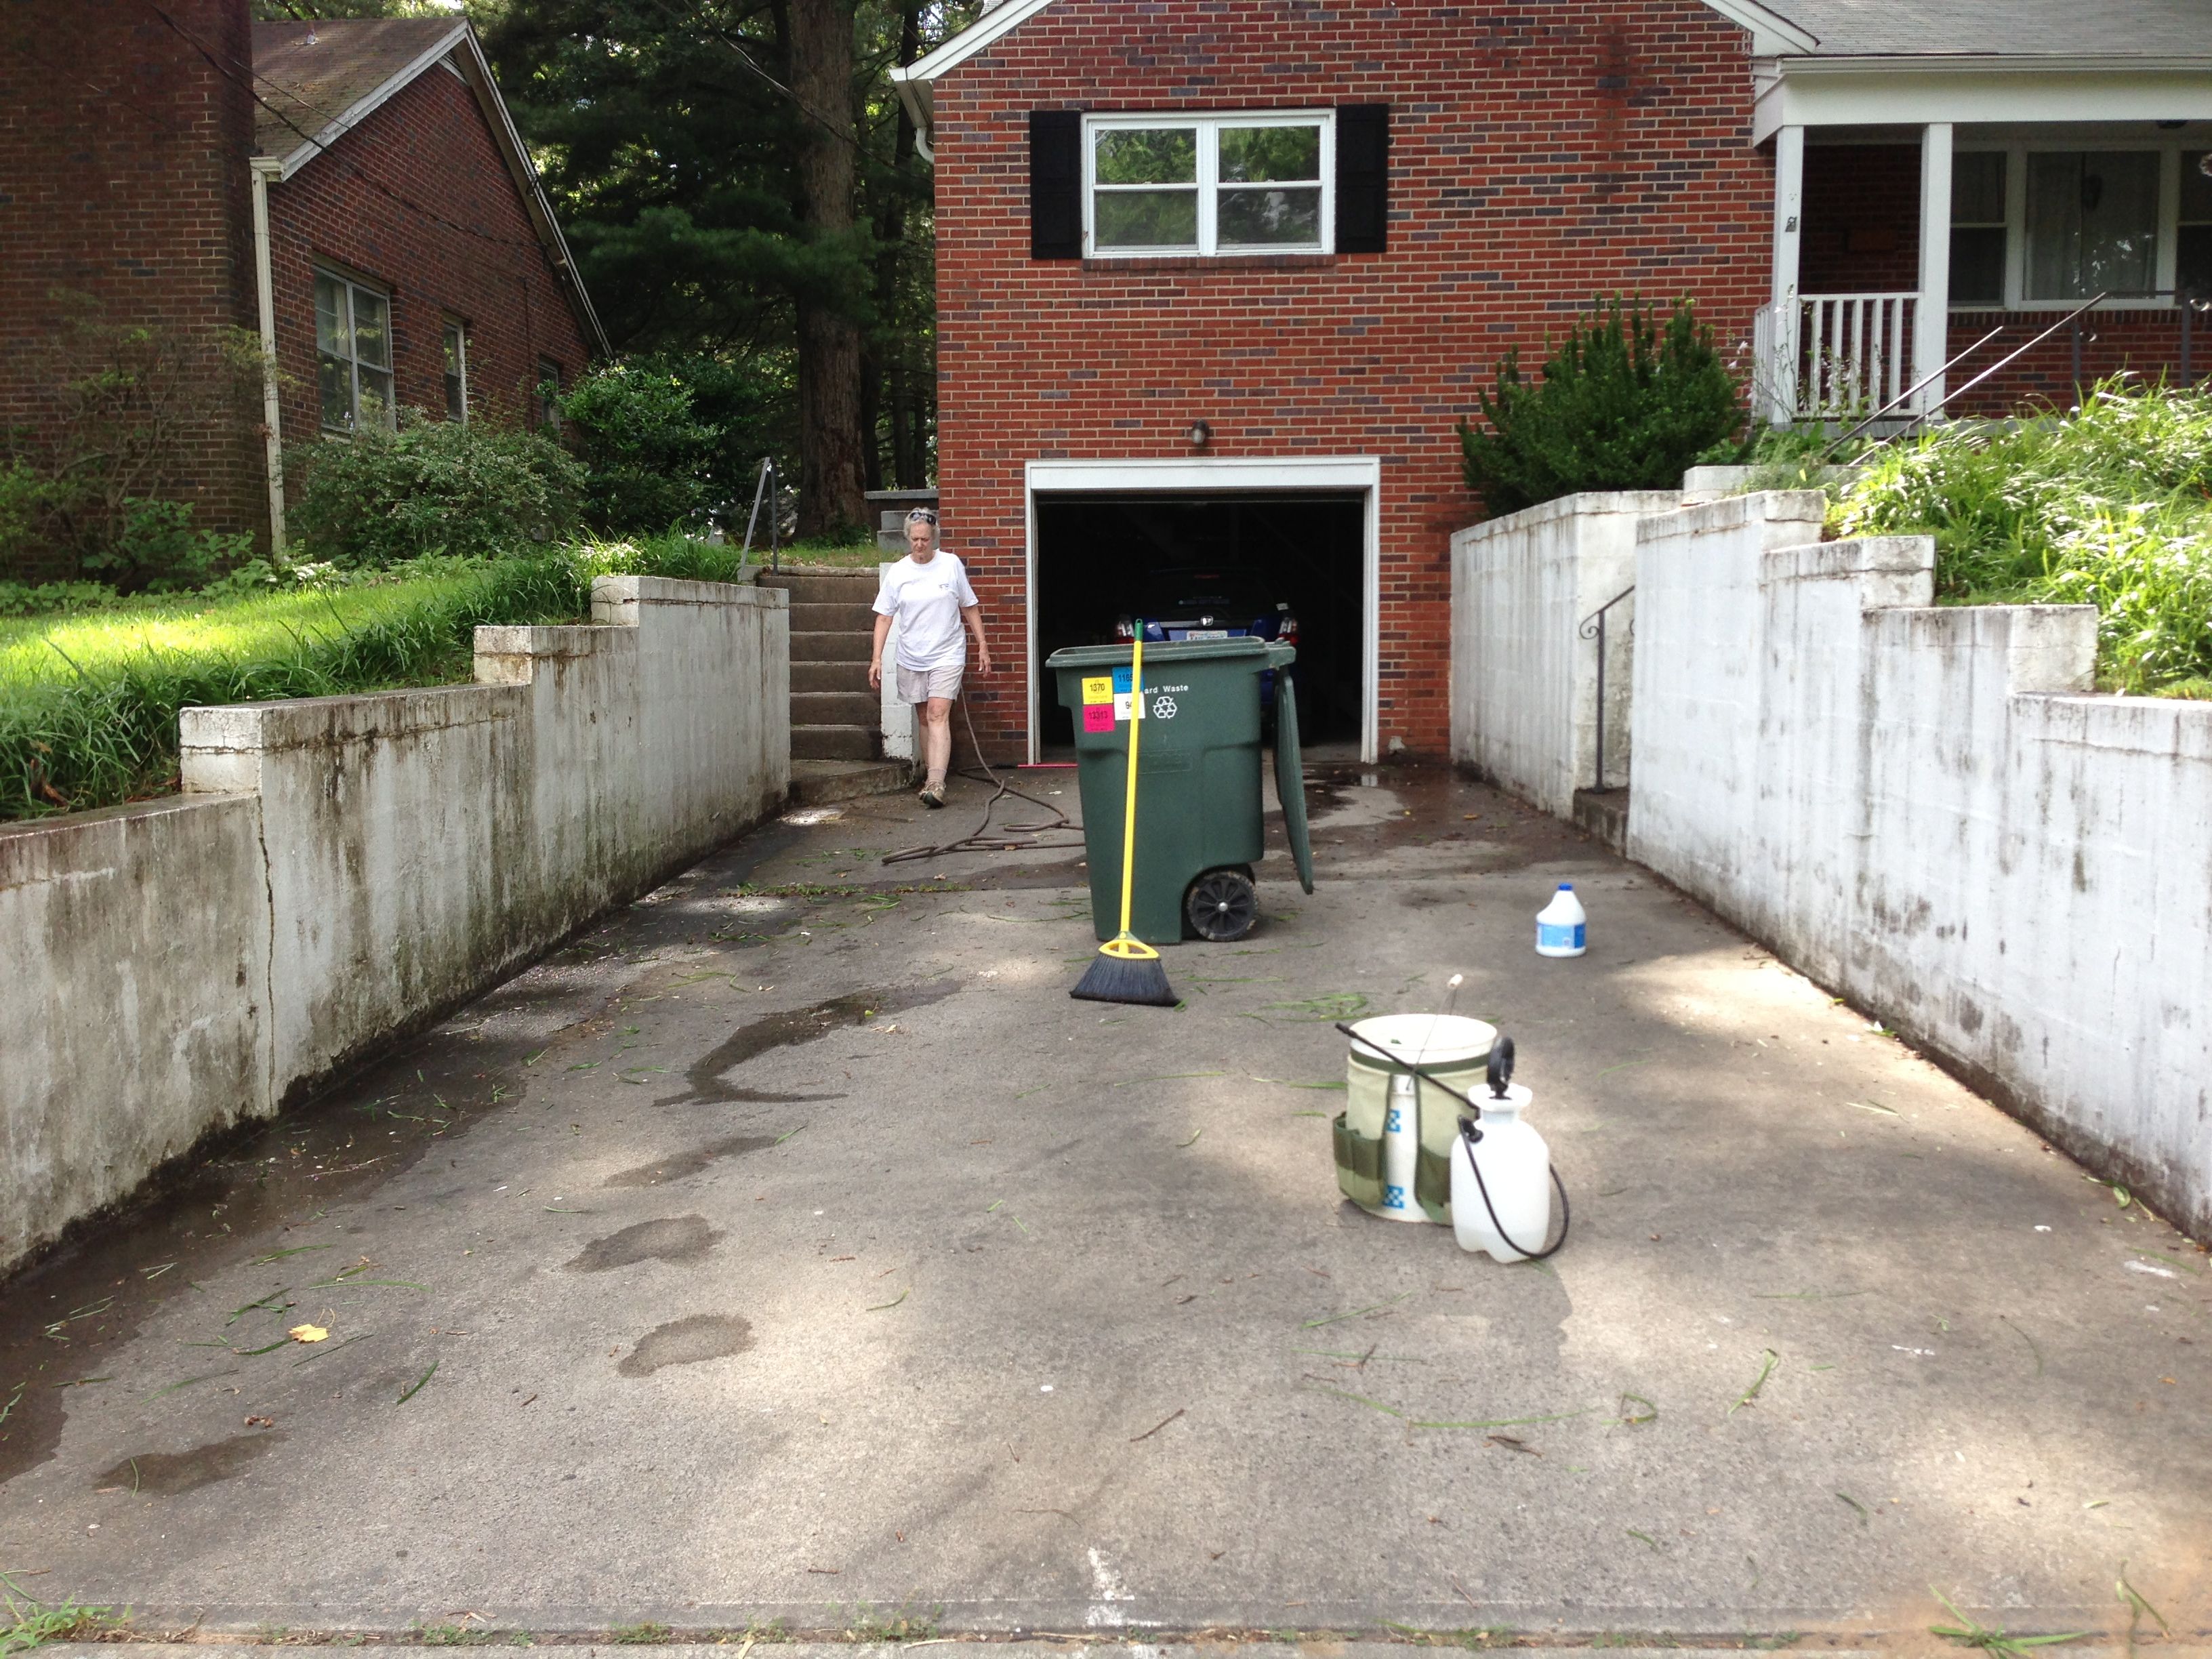
In this photo, the right-hand wall has been washed. The left wall has not.
Pressure washing
Then it rained every weekend for three months.

Finally we had a clear weekend, so we had to take off all the loose bricks and reattach them – most of them were loose because of failing mortar, so we chipped off the old mortar and re-laid them with fresh. A few could just be glued back into place, so that was the easier solution in a couple of cases. There’s also one large crack (my wall is very slowly falling over, a process which I hope will take several more years) that we filled with mortar as well, just so the grass and liriope will stop trying to grow through it.

My dad and I are very focused on mortaring.
IMG_0612

Then I went on vacation, and it rained some more.

This weekend it was clear! I went around and filled all the hairline cracks with concrete patch. Then it was time to prime – 1.5 gallons of Kilz and 3 hours later, I was thoroughly coated in primer and so was the wall. Today I top coated the entire wall with masonry paint, and called it done. The worst bit was painting near the liriope – evidently all the crickets live in the liriope, and they were certain I was coming to get them, so they’d randomly pop out of the plants to escape me. Except they tended to jump straight towards me, which meant I’d flail backwards, trying to get them off me, and they’d go leaping off somewhere else, only for another cricket to repeat the whole sequence a minute later. But the wall is painted, and it looks pretty awesome, if I do say so myself (and I do, after seeing the “before” shot from pressure-washing!).
Finished Wall!

Painting a front door

This winter, I re-weatherstripped my front door. This involved prying off all of the old weatherstripping that had been painted over several times, fixing the threshold, and installing new weatherstripping. That part was fairly straightforward, though I ended up repainting the doorframe in the process.

However, the old weatherstripping had attached to the door itself, so removing it had removed a lot of paint and left the edges of the door looking pretty bad. So I needed to repaint the door. It was painted white, over cream, but I decided that I’d like to do a more dramatic color instead. After some consideration, I narrowed down my options to a very dark purple that picks up the tone of the bricks, or the same turquoise that I have on,y living room wall. Since I wanted more brightness, I went with the turquoise.

The first step was scraping off the old paint. I discovered fairly quickly that the white paint was latex, while the cream paint underneath it was oil. This was a problem, because it meant the white paint chipped off a lot more than I had expected. After several weekends of scraping, I decided it was good enough, and took my power sander to all the flat surfaces to smooth them out. I also used wood filler to clean up the edges where the old weatherstripping had attached – tiny nail holes every couple inches around the entire door.

Once I’d prepared the surface by filling and then sanding, it was time to paint. I took all the door hardware off – I considered replacing it, but I’d been given a new door knocker that matched the existing brass handle and deadbolt, so it seemed unnecessary to change those. I also bought a peephole so I can see who’s on my porch without standing on my tiptoes to see out the windows.

I didn’t want to use oil paint, so I chose a primer that would go over oil but allow me to use latex paint. After a coat of that, I did two coats of exterior latex, using a brush for the narrow grooves and a mini roller for the large panels. This part was frustrating because I had to have the door open for nearly an entire day to do all the coats, and my cats were not pleased at being confined to the studio while I worked. But the paint went on beautifully, and dried quickly enough that I could shut the door that night without it sticking. Once it was dry, I reassembled all the door hardware, including reversing the deadbolt that’s been backward since the day I moved in! I also scraped all the excess paint off the windows – I decided it was easier to scrape them than to tape them in advance, and it worked fine.

So here’s my lovely, newly painted front door! Ignore the peeling paint on the porch floor, that’s a project for another day…

20130707-140311.jpg

Corner TV Table

So, now the project that I delayed in order to make an actual wood workshop: the tv table!

My current tv table looks like this:
20130224-175943.jpg

Too small for the tv, wedged awkwardly into the corner despite not being a corner table, and my stereo speakers don’t fit inside it (and even if they did, I’d have to open the glass doors to hear them). Clearly this is no longer the right piece of furniture.

So I designed my own corner tv stand – it’s based off the previous tv stand, with some important tweaks. First, it’s a corner tv stand instead of a rectangle. It’s sized so it’s wide enough for the tv, but doesn’t block the baseboard vent to the right of the stand. It’s wide enough to hold my stereo and its speakers. It doesn’t have doors on the bottom section, so I can use my stereo without having to open doors. It also has two shelves for the Tivo, Wii, DVD player, and their accessories. Continue reading

Basement workshop

So, last I posted, I had big plans for a corner tv stand. Well, really, I had an idea that I wanted a corner tv stand, and that was about it. But instead of going ahead and building a tv stand, I decided I really wanted to turn the man-cave into my wood workshop first. (Yes, no project in this house is ever just one project, it’s always got something else that needs doing first.) My workbench has been in a corner of the basement for the past couple years, which was fine except that every time I cut wood or sanded anything, I got sawdust everywhere, including on my laundry. So confining the woodworking to a separate space before I built a large piece of furniture seemed worthwhile.

First I had to clean the man-cave. I swept out the whole room, scrubbed the walls, and the floor, and finally figured out why there’s an awl sticking out of the window frame of the one window in there – it’s holding the window closed. Hmmm. I also decided to paint over all the fake wood paneling that’s on the two walls that aren’t cinderblock, and repaint the cinderblock, since the scrubbing only helped a bit with its looks. After a solid coat of Kilz primer, I painted the entire room white, which actually made a great difference in how dark and icky the room seemed.

Then I bought two big sheets of pegboard for tool storage, and painted them bright green – the same color as my studio wall upstairs. I used a tiny roller so I didn’t clog up any of the peg holes, which worked really well. Then I hung the pegboard on one of the cinderblock walls, just above where my workbench would end up. (Tapcon screws are awesome for this kind of thing!) I had leftover wire shelving from a previous pantry, so I built it into a small shelf unit for things that won’t go on the pegboard, and I bought big heavy-duty shelf brackets to use on the opposite wall as lumber storage. My basement gets wet pretty rarely, but it’s enough that any wood supplies need to be off the floor lest they get damp.

20130219-211952.jpg

At this point, I needed to move the actual workbench into the man-cave, so I called my dad. This workbench is eight feet long, with power outlets on the legs, and a solid slab of MDF as the top, plus a shelf the full length of the bench (made from not-very-thick MDF, so it’s very wavy, but it still works). So I got my dad to come over to help me move my workbench into place, and then discovered… it wouldn’t go through the door. Oops. So we spent half an hour taking the workbench apart, and moved it into the right room in pieces. Then I got to reassemble it, and added an extra bracing piece which makes it way sturdier than it ever used to be. So that was actually an unexpected improvement.

20130219-211415.jpg

And now I have an actual wood shop, where I can close the door and keep from covering the entire basement in sawdust when sanding. It’s pretty great!

New tv, new projects

I don’t watch a ton of television, so I’ve had a 20″ CRT since college, which has done well by me for that entire time. But when playing Donkey Kong Country earlier this year, I ended up sitting on my coffee table to get close enough to play effectively. That was the push I’d needed to start considering a bigger tv, and then I got a quick freelance job that gave me a bit of “extra” cash to spend. With flat-screen LCDs getting less expensive, I started researching options, and ended up with the LG 42CS570 – not one of the newer smart tvs with internet and all of that, but a good, basic, widescreen tv. You guys, it’s so big. And so shiny. And it weighs less than my previous tv, despite being twice as wide. I’m actually really glad they give you a way to screw it into your tv stand, because I might worry the cats would knock it over.

Anyway, as we know, any new acquisition in my house will somehow become a project – and the tv is no exception; in fact, it’s two projects! Number one: move the antenna into the attic so there are no rabbit ears distracting from my shiny shiny tv. Number two – build a corner tv stand so it looks like it belongs in my living room.

Antenna-moving happened last week – the plan was to stick the antenna in the attic, drop the cable from the attic through the wall, and install a cable connector plate on the wall so all that you see is a nice clean coax connector. Preferably really close to the corner so the tv stand will cover it. This… is actually what happened, but it’s never as simple as it sounds, is it? Continue reading

Digging up my yard

I have a new goal this spring — care about my yard. I’ve been much more willing to fling myself into big indoor projects like redoing my kitchen or building furniture than paying any attention to that vaguely green area outside the walls. But with some serious help and encouragement from my mom, that’s changing. I’m starting fairly small – there’s a 9′ by 12′ area out front that’s bordered by the house, the walkway, and the driveway that would be a really nice flowerbed. It had some random hostas, liriope, and lots of crabgrass, plus a row of bushes to keep people from falling off the yard into the driveway (about a six foot drop). It also has a rose that insists on producing lovely pink flowers despite my total neglect.

So the first step in turning this zone into a flowerbed was digging everything up. We left the bushes and the rose, but after more discussion today, it looks like the rose will need to go too, despite its awesomeness, because it’s in a really awkward spot. Anyway, last Saturday we spent a couple hours digging everything out, and marveling at the vast number of earthworms in my yard. Today, we started the very tedious process of sifting all the dirt to get random bulbs, rocks, and roots out of it. I also took on a tiny triangle to the right of the path, which used to be full of random grass, and today I dug it all out.

Turns out digging up a flowerbed involves finding strange objects… like a railroad spike, a Spirograph wheel, a beer bottle, a plastic washer, the biggest earthworm ever (no seriously, I’m talking seven inches long, the thing was like a snake), and speaking of snakes, two six-inch long brown snakes, which I’ve discovered by Internet were probably either worm snakes or earth snakes- both totally harmless, and interestingly, live on earthworms. Tasty.

So there’s a lot more sifting in my future, and then we get to do the fun part, picking plants! I’ll try to actually take pictures for the next few steps.

Kitchen clock

The back wall of the kitchen has been looking a little lopsided for a while, with a big piece of art on it that’s centered to the table, not the wall:

That’s because I’ve been saving the space to the left of it for a clock. But I hadn’t found one I liked, so I outsourced the problem to my family by asking for a red kitchen clock for Christmas. And that is exactly what I got from my eldest sister:

It even has a fork and knife as the minute and hour hands! Totally awesome. And it takes up that blank spot on the wall perfectly:

And there’s Dante, photobombing my shots as usual. Anyway, that’s my most recent tiny update to the kitchen.

Inexpensive flat files

I have a lot of art. This is what happens when you’re an art major – you end up with a lot of art, and not enough time/space/money to hang it all on the walls. Which means I have 3 separate portfolios full of pieces that I want to keep, but don’t have room for. And most of it’s on paper, which mean storing it flat is the optimal solution. So I started looking for flat files – things like this:

Flat file

That beautiful 5-drawer flat file? Costs nearly $700 dollars. A metal version costs more. I do not have $700 to spend on flat files.
Continue reading

banquette complete!

This is going to be the short version because I have to pack tonight, but: the banquette’s done!

I painted the whole thing – primer and two coats of the same paint that’s on all the wood trim in the house. Then installed shoe molding, and caulked the gaps where stuff didn’t quite meet perfectly.

Continue reading

banquette structure

So the last post had the basic frame and sides of the banquette built – now I just had to cover the sides and put the tops on. It turns out I did this in the wrong order – I should’ve attached the tops first, because then I could’ve screwed it in from below, hiding all those screwheads. Luckily, I’m painting the whole thing, so I’ll just spackle over them all. Anyway, I cut the right-hand section to size, sanded down the front edge so it’s a nice smooth curve instead of a sharp edge, and screwed it in. That was the simple side. Continue reading